RANE SEVENTY TWO

INSTALLATION
Firmware & Drivers
Firmware: Update the firmware of the unit to the latest version from Rane Dj Downloads
Drivers: Install the latest drivers (for both Windows and MacOS X computers) from Rane Dj Downloads
VirtualDJ 2018 Setup
Download and install VirtualDJ 2018 from our Downloads Page (in case you have not done already)
Once VirtualDJ 2018 is launched, a Login Window will appear. Please login with your preferred method from the ones provided.

A Pro Infinity or a Pro Subscription License is required to fully use the Rane Seventy-Two.
Without any of the above Licenses, the controller will operate for 10 minutes each time you restart VirtualDJ.
Buy a license
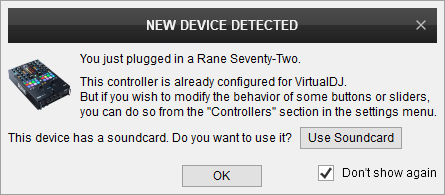
Click on the "Use Soundcard" button in order VirtualDJ to apply the pre-defined audio configuration. Keep in mind that due to the nature of the unit, speakers need to be connected to the Master Output of Seventy-Two and the pre-defined audio configuration has to be used.
Click to OK.
Advanced Setup
MIDI Operation
The unit should be visible in the CONTROLLERS tab of Config and the “factory default” available/selected from the Mappings drop-down list. The factory default Mapping offers the functions described in this Manual, however those can be adjusted to your needs via VDJ Script actions.
Find more details at VDJ Pedia

AUDIO Setup
The unit has a pre-defined Audio setup and a special button in the AUDIO tab of Config to provide that. Alternative Audio setups can be applied in the same window.

For further software settings please refer to the Manuals of VirtualDJ 2018.
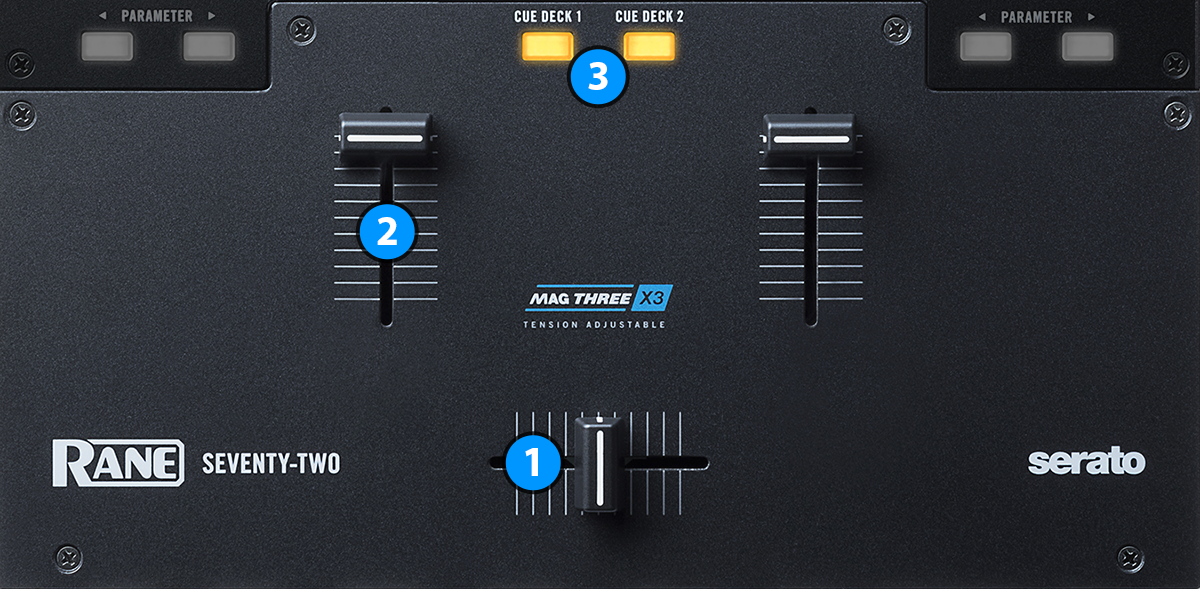
LAYOUT
S SHIFT: Hold this button down to access secondary functions of Rane Seventy-Two (mainly marked with a white arrow looking up in the mixer's silkscreen)


The functionality of each button, knob and slider per section (as shown in the image above) will be explained in detail in the next chapters
Mixer
KEY
ACTION
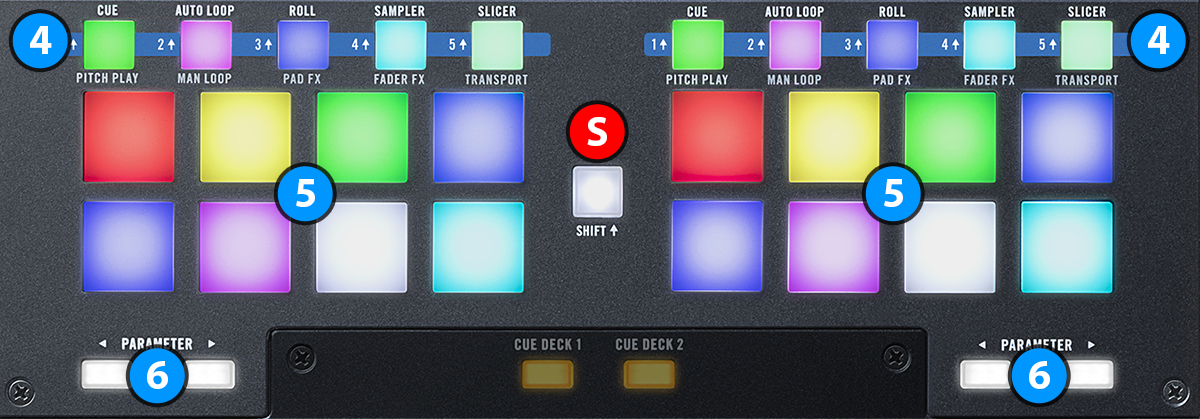
Performance Pads
The 8 RGB Pads offer various functions, depending on the selected Pad mode. Each of the 5 Pad mode buttons offers 2 individual modes. Press a pad mode button once to access it's primary mode, and press it again to access it's secondary mode. The modes represent a page of the PADS section on the default VirtualDJ GUI.
KEY
ACTION
Press any of the 5 available Pad mode buttons twice to set the Pads to Pitch Play, Manual Loop, Pad FX*, Fader FX* and Transport mode.
* Pad FX and Fader FX Pad Modes are hardware operated by Rane Seventy-Two firmware
The Parameters of each mode can be adjusted from the VirtualDJ GUI (Pads section)
Read further details about Pads in the VirtualDJ manual.
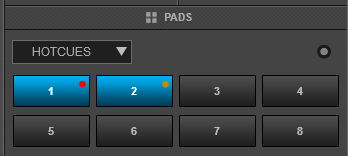
HOT CUES
Each one of the 8 pad assigns a Hot Cue Point (1 to 8) or jumps the track to that Hot Cue Point (if assigned).
When a Hot Cue Button is unlit, you can assign a Hot Cue Point by pressing it at the desired point in your track. Once it is assigned, the Hot Cue Button will light on.
Hold SHIFT and then press a pad to delete its assigned Hot Cue Point.
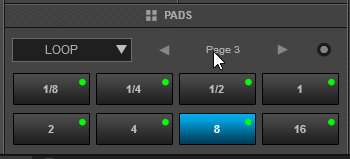
AUTO LOOP
Press one of the pads to trigger an Auto Loop of a different size in beats, depending on the selected page. There are 6 different pages available with sizes starting from 1/32 up to 128 beats.
Use the PARAMETER buttons to select the previous/next page with the desired Loop sizes
Hold SHIFT and then use the PARAMETER buttons to change the behavior of the Loop pads, by selecting the On/Off (toggle), Hold (momentary – while pad is pressed) or the Roll mode (track will resume to the position it would have been once the pad is released)
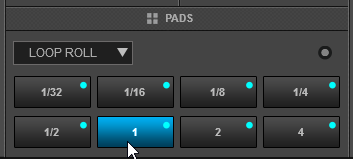
LOOP ROLL
Press and hold one of the pads to trigger a momentary (while pressed) auto loop of a different size in beats. Once the pad is released the track will resume to the position it would have been as if the pad was not ever pressed.
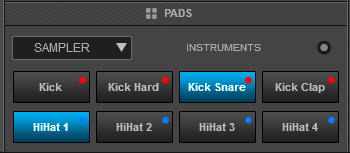
SAMPLER
Each one of the 8 pads triggers a sample from the selected Sampler Bank of VirtualDJ. If a bank has less than 9 samples, both sides of Rane Seventy-Two will control the same samples. If a bank has more than 8 samples, the left side of Rane Seventy-Two will control samples 1 to 8 and the right side samples 9 to 16.
Press the pads to trigger a sample. Depending on the selected trigger Pad mode, use SHIFT and the same pads to stop the sample.
Use the PARAMETER buttons to select the Sampler Bank (previous/next).
SLICER
The 8 pads represent eight sequential beats—"Slices"—in the Beat Grid. The currently playing Slice is represented by the currently green lit pad. The light will move through the pads as it progresses through each eight-Slice phrase. Press a pad to repeat that Slice (hold it down if you want to keep looping it).
Once the Pad is released the track will continue to play from the position it would have been if the pad was never pressed.
Hold SHIFT and then use the Pads to repeat the memorized Slices (the Slices played/repeated last time)
Use the PARAMETER buttons to adjust the length of the Loop applied to the slice. or adjust the step of the Slices

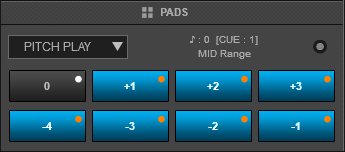
PITCH PLAY
*This page is specifically designed for Rane Seventy-Two and will not be available if the unit is not connected.
In this mode, the Pads trigger a selected Hotcue point (or the Temporary Cue if none selected or not available) at a selected Key semitone (from -7 to +7).
Three different banks are offered with various semitone values to use and a 0 value (reset key to its original value) is always offered in all pages.
Hold SHIFT and then select a Hotcue for the Key pads to trigger. Each time a Pad is pressed, the track will jump to that Hotcue point and will also alter the Key of the track to the value designated by it assigned value.
Use PARAMETER buttons to adjust the Key of the track without trigger a Hotcue.
Hold SHIFT and then use the PARAMETER buttons to select a different bank with different key semitone values.
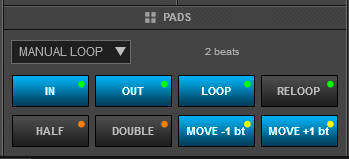
MANUAL LOOP
Each one of the 8 pad offers a different loop function.
Use Pads 1 and 2 to set a Loop Entry (In) and a Loop Exit (Out) point for manual looping.
Use Pad 3 to turn off the Loop (if enabled) or trigger a Loop of the selected size in beats
Use Pad 4 to repeat the last triggered loop (reloop)
Use Pads 5 and 6 to half/double the size of the Loop.
Use Pads 7 and 8 to move the Loop (if enabled) forward/backwards by 1 beat
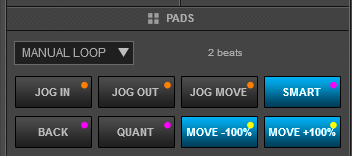
While SHIFT is pressed use ..
Pad 1 to set the Jogwheel to Loop In Adjust mode and use the Jogwheel to fine adjust the Loop In position
Pad 2 to set the Jogwheel to Loop Out Adjust mode and use the Jogwheel to fine adjust the Loop Out position
Pad 3 to set the Jogwheel to Loop Move Adjust mode and use the Jogwheel to fine move the Loop through the track.
Pad 4 to enable/disable Smart Loop. When Smart Loop is enabled (default status), using Loop In and Loop Out buttons to trigger a Manual Loop, will result of a seamless loop (track will stay on beat)
Pad 5 to enable/disable Loop Back mode. When Loop Back mode is enabled, and an Auto Loop is enabled, the current track's position will be considered as the Loop Out (Exit) point of the loop and the passed part of the track will be looped.
Pad 6 to enable/disable Quantize Loop mode. When enabled, the Loop In point of a Loop will be snapped to the nearest beat
Pad 7 and 8 to move the loop (if enabled) forward/backwards by the amount of the size of the loop.
Use the PARAMETER buttons to half/double the size of the Loop
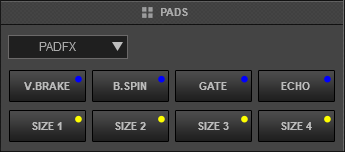
PADFX
*This page is specifically designed for Rane Seventy-Two and will not be available if the unit is not connected.
The 4 upper pads offer 4 different effects to use (Vinyl Brake, Backspin, Gate and Echo) while the 4 lower pads offer 4 different sizes to perform the selected effect.
In order to use an effect, press one of the 4 upper pads to select it and then press one of the lower 4 pads to apply the effect with the desired size.
Please note that these effects are hardware operated by Rane Seventy-Two firmware, and they won't apply if you click on the pads on VirtualDJ GUI.
For further details about the effects offered on this page please advise the unit's user guide.
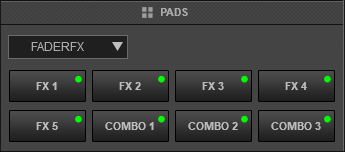
FADERFX
*This page is specifically designed for Rane Seventy-Two and will not be available if the unit is not connected.
In this mode the 8 pads offer 8 different volume transformation effects to use.
In order to use an effect, press and hold one of the 8 pads. The effect will be applied for as long you keep the pad pressed down.
Please note that these effects are hardware operated by Rane Seventy-Two firmware, and they won't apply if you click on the pads on VirtualDJ GUI.
For further details about the effects offered on this page please advise the unit's user guide.
TRANSPORT
*This page is specifically designed for Rane Seventy-Two and will not be available if the unit is not connected.
Use Pads 1 and 2 to bend (alter the pitch momentarily) the track down or up.
Use Pads 3 and 4 to decrease or increase the speed of the track (by altering it's pitch)
Use Pad 5 to toggle Master Tempo (When Master Tempo is active the track returns to it's original key regardless of the pitch setting)
Use Pad 6 to sync the track (automatically match the corresponding deck's tempo with the opposite deck's tempo and phase)
Use Pad 7 to cue the track.
Use Pad 8 to play or pause the track.
Equalizer

KEY
ACTION
Effects
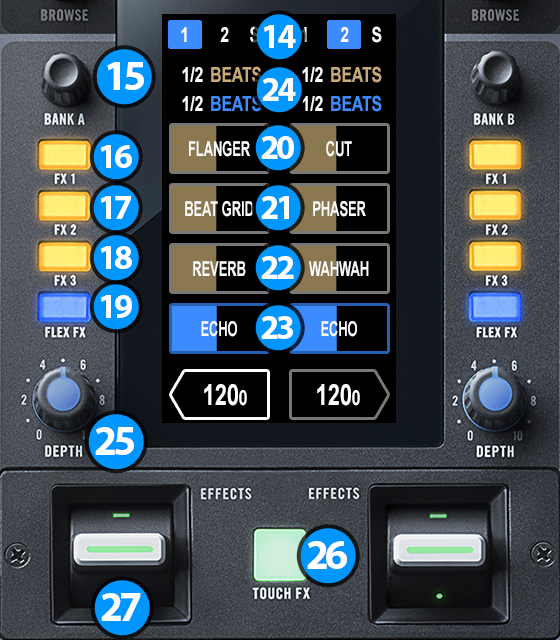
Rane Seventy-Two offers you the ability to combine Hardware Effects (Flex FX) with Software Effects at the same time.
You can activate up to four Effects at once per deck. Three of them are software (provided by VirtualDJ) and one of them is hardware (provided by Rane Seventy-Two firmware).
For this reason the screen of Rane Seventy-Two offers four effect slots per deck numbered as 20, 21, 22 and 23 on the picture above.
The way effects work with Rane Seventy-Two differs from the way effects work with most other controllers.
You must "arm" an effect first before you are able to activate / apply it on a deck.
For this, you must use the buttons marked as 16, 17, 18 and 19 to arm the effects you wish to use, and then activate them by using the EFFECTS lever (marked as 27)
When you use the EFFECT lever, all armed effects are activated at once (chained effects).
KEY
ACTION
Due to firmware limitations, for the effects to operate properly with VirtualDJ, left side of the screen must be assigned on deck 1 and right side on deck 2.
- Click on one of the FX slots (20, 21, 22 or 23).
A white arrow will show up on the slot's box. This indicates that the slot is selected. - Turn the PARAMETER knob clockwise to increase the strength of the effect. Turn the PARAMETER knob counter clockwise to decrease the strength of the effect.
- Push the PARAMETER knob down.
The FX ARM button of the selected slot should start blinking. - Turn the PARAMETER knob to select a new effect for the slot.
- Push the PARAMTER knob once more. The selection has been completed and the slot will stop blinking.
When the slot is armed the led of the button will turn on with full brightness.
When the slot is armed the led of the button will turn on with full brightness.
When the slot is armed the led of the button will turn on with full brightness.
When the slot is armed the led of the button will turn on with full brightness.
Click the box with your finger to select slot 1 as the "working" slot for the PARAMETERS knob (a white arrow will appear on top side of the box)
Click the box with your finger to select slot 2 as the "working" slot for the PARAMETERS knob (a white arrow will appear on top side of the box)
Click the box with your finger to select slot 3 as the "working" slot for the PARAMETERS knob (a white arrow will appear on top side of the box)
Click the box with your finger to select slot 4 as the "working" slot for the PARAMETERS knob (a white arrow will appear on top side of the box)
Please note that the effects on this slot are provided by Rane Seventy-Two firmware (hardware effects)
Click on one value and use the PARAMETERS knob to adjust it.
Please note that effect beats timing is not available for all software effects
Touch the screen at any place inside the parameters box to apply momentarily (while pressed) the selected effects. Once you lift your finger, the effects will stop from being applied.
You can reverse these levers so that upper position is momentarily and down position is permanent if you wish. For further details please advise the unit's user guide.
By default the effects on Rane Seventy-Two are applied as post-fader effects. This means that they are applied after the volume fader setting. This mode allows effects trailing to be heard even after turning channels volume to zero. However for this reason you won't be able to pre-listen the effects on your headphones. If you wish to change this behavior you can change the fxProsessing setting in VirtualDJ options and set it to pre-fader.
Screen
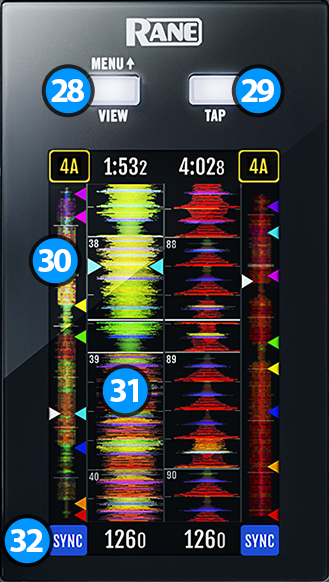
Rane Seventy Two offers a touch screen that allows you to scroll the browser, see various information about the current loaded tracks and manipulate effects, (see EFFECTS page of this manual for more information about effects handling).
KEY
ACTION
Hold this button down to access the unit's settings menu (hardware operation)
Hold down SHIFT and press this button to slowly reset BPM back to it's original value.
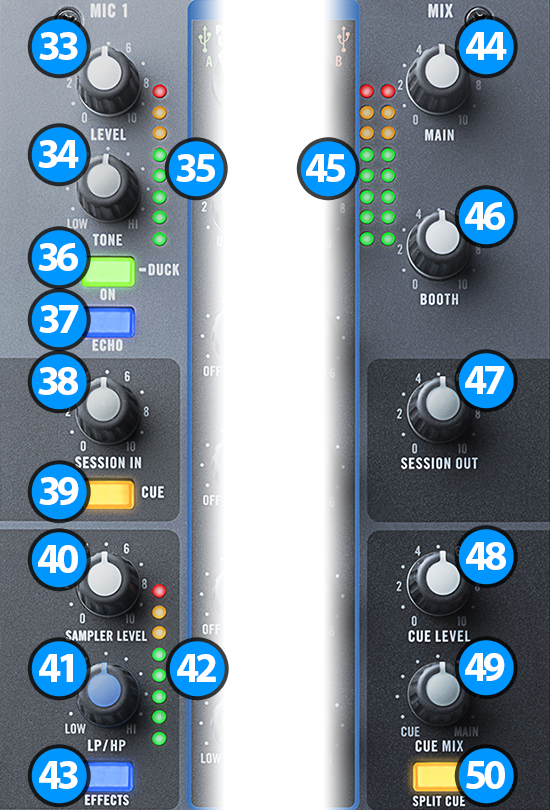
Input/Output Controls
KEY
ACTION
When Duck is active, the volume of mixer channels is automatically lowered when the microphone receives signal.
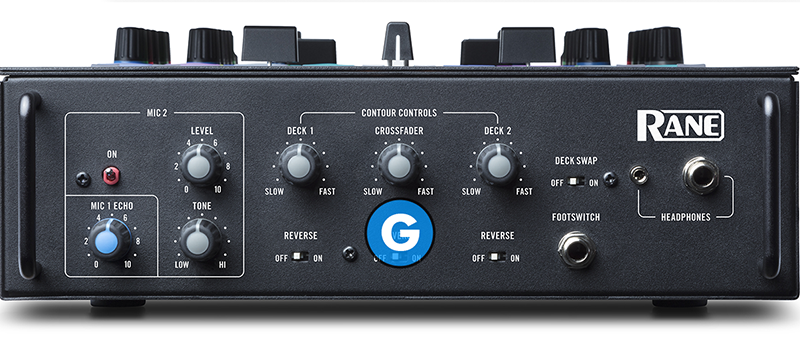
Front & Rear
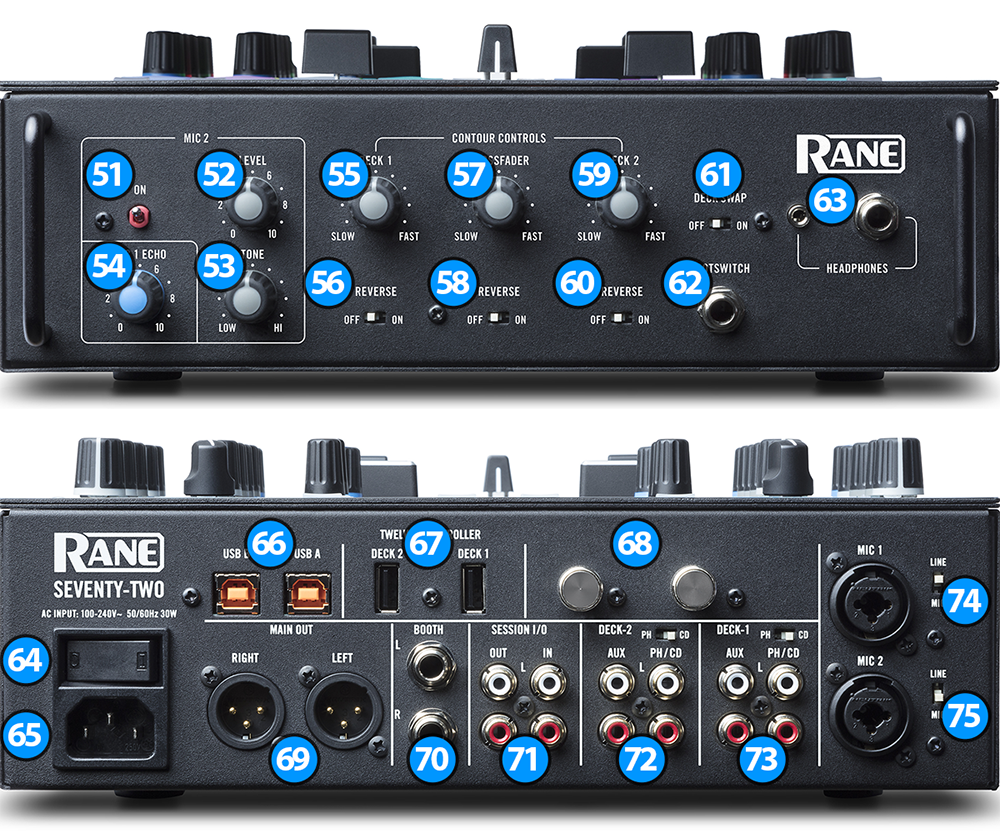
KEY
ACTION
By default there's no action assigned to footswitch control. However, footswitch is accessible through devices tab in VirtualDJ configuration and allows you to map it to perform any action you wish.
Please make sure that you have made all the necessary connections on the back of the unit before turning it's power ON.
You can connect up to two computers by using the two ports of the device (labeled USB A and USB B).
Make sure that you turn the channel CH INPUT SWITCHES (13) to the correct USB port for software mixing.
Please note that the output is balanced (TRS).
Attention: When you connect a device on the PH/CD RCA plugs make sure that you also switch the PH/CD switch on the appropriate position depending on the device you have connected. Failing to do so may result in heavy distortion or a very weak signal of the analog source.
Attention: When you connect a device on the PH/CD RCA plugs make sure that you also switch the PH/CD switch on the appropriate position depending on the device you have connected. Failing to do so may result in heavy distortion or a very weak signal of the analog source.
Advanced Audio Setup
Timecode (DVS)
VirtualDJ is offering DVS (Digital Vinyl System) support for the Rane Seventy Two. A Timecode Plus or Pro Infinity license is required. 2 Timecode Inputs are available to control any software decks via Timecode CDs or Vinyls.
All Mixer Channels can accept LINE (Timecode CDs) or PHONO Sources (Timecode Vinyls) depending on the CD/PH switchers at the rear panel of the unit.
- Connect your Timecode devices at the rear panel of the Rane Seventy Two
- Open VirtualDJ configuration window and select the AUDIO tab on the left
- Click on the "TIMECODE SIGNAL" button to enable the timecode inputs
- Your sound setup should be like the one shown on the following image:
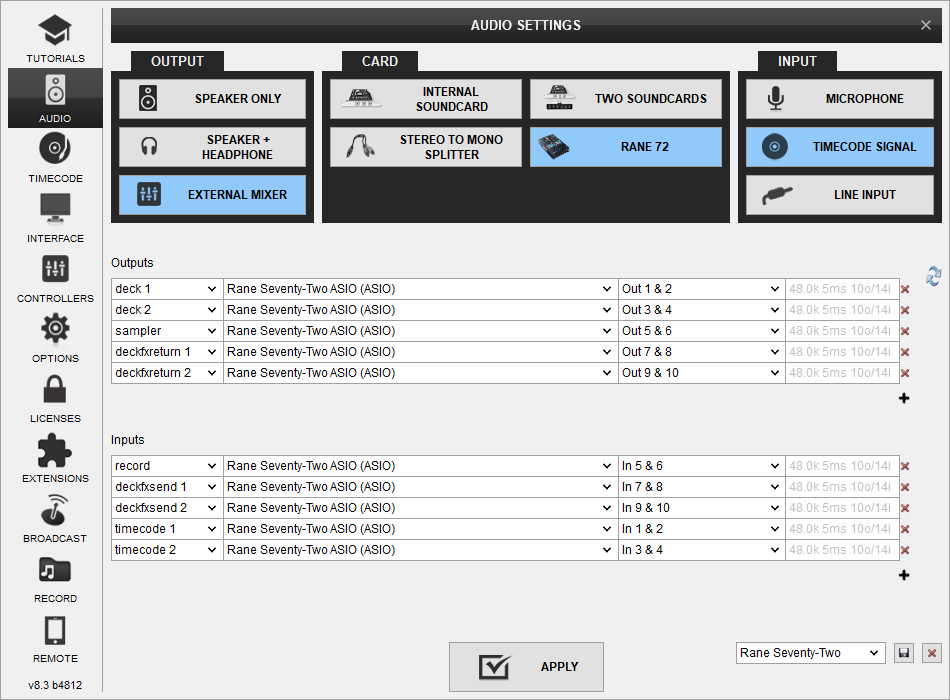
Rane Seventy Two Sound Configuration with Timecode Inputs Configured - Click on "Apply" button
- Click on the TIMECODE icon on the left side of configuration window.
- Press PLAY on your timecode CD or Vinyl device and VirtualDJ will automatically detect your Timecode type and make the appropriate adjustments for best performance.
- Click on the ON buttons from the TIMECODE panels of the Default Skin (in the SCRATCH center panel) to enable the Timecode control to any of the 4 software decks.
- Press PLAY on your timecode CD or Vinyl device and VirtualDJ will automatically detect your Timecode type and make the appropriate adjustments for best performance.
- Press the CALIBRATE button if for any reason the signal is not detected (possibly due to reversed phase connections).
Back to back
The Rane Seventy Two has two USB ports, allowing simultaneous connection of two computers. Each port is completely independent. It is possible to run VirtualDJ on one computer and any other DJ-software on the other, Mac or PC.
How to:
- Connect the 2nd computer to the unused USB port on the Seventy Four.
- Switch the Input Source of the non-playing mixer channel to the USB source of the 2nd computer.
- Play a track on this deck and mix it when ready – you ll now have audio from both computers during the mix.
- Fade out the audio playing from the 1st computer to the audio playing from the 2nd one.
- When only audio from the 2nd computer is left in the mix, remove the first computer.
- Assign the Input Source for the remaining free mixer channel to the 2nd computer and keep mixing.
Recording
The Rane Seventy Two has a dedicated Input to record your Main Mix. VirtualDJ has pre-configured this input for recording, thus no special setting is required in order to record your mix (including analogue sources and Microphone).
Use the REC or BSCAST buttons from the MASTER center panel of the VirtualDJ GUI to Record or Broadcast your mix.
